Connect to ViewHub with the T1V app:
Download the T1V app from t1v.com/app or (for Android/iOS devices) visit the app store. For further installation instructions, see the following:
Once you've downloaded the T1V app, you can connect by:
1. Select 'Room'
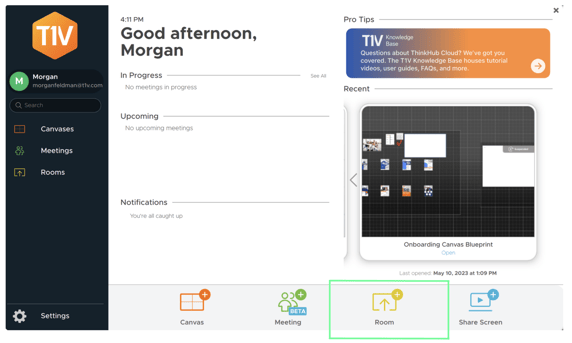
That will bring you to this menu:

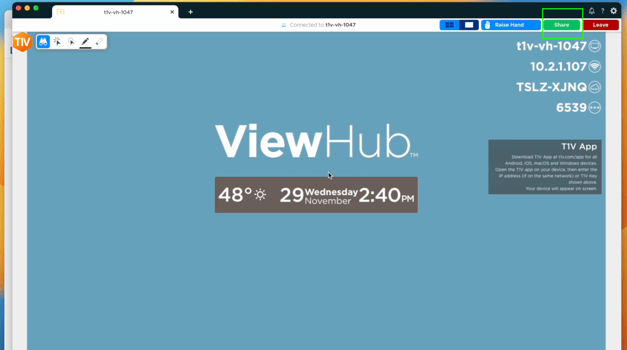
2. Enter the Room ID (8-letter code located in the upper right or left of your ViewHub)

3. If your ViewHub has a 4-digit passcode, enter that next.
4. Select 'Join'
You're now connected to ViewHub. To start sharing your screen, select 'share'.
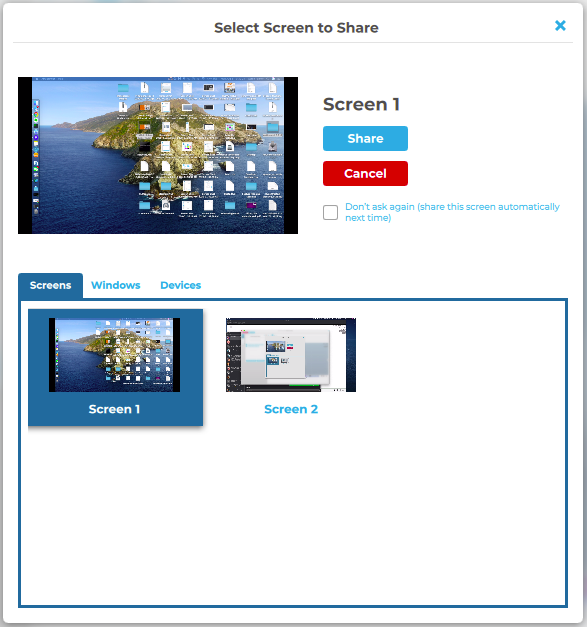
Selecting a window or screen to share
Share a window or your entire device screen. Select ‘Share’ when you have selected what content to share from your device. Select ‘Cancel’ if you do not wish to share content from your screen.
After you select ‘Share,’ you will see a gray or black bar at the top of your device screen. This indicates you are successfully casting your device screen to the ViewHub.
![]()
There are additional screen-sharing options available in the drop down menu to the right.
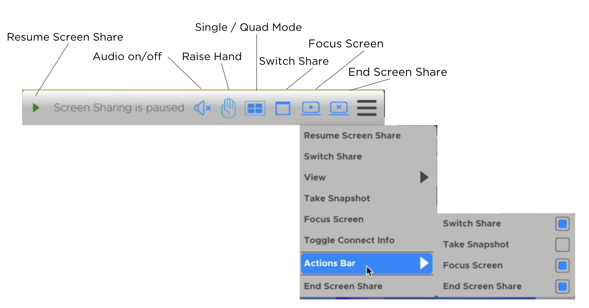
1. Pause/Resume Screen Share
Pressing the pause button will leave a snapshot of your screen on the T1V room display. The button will turn into a play button so that you can resume screen sharing when ready to broadcast live content. Select the same icon or ‘‘Resume Screen Share’ to share live content from your laptop.
2. Audio on / off
Select to turn audio on or off while screen sharing.
3. Raise Hand
Let the instructor know you have a question or comment by virtually 'raising your hand'.
4. Single / Quad Mode
Select between single and quad mode. In Single Mode, one screen share is displayed at a time. Quad mode displays up to four screen shares simultaneously.
5. Switch Share
Tap here to switch which content you want to share from your laptop (no need to disconnect!).
6. Focus ScreenIn Single Mode, selecting this will replace any current screen share with your screen share. In Quad mode, selecting this will move your screen share to the upper left.
7. End Screen Share
Tap to stop sharing your screen to the ThinkHub or T1V Hub display.
8. Toggle Connect Info
From here, you can toggle the T1V app connection info (Room ID, passcode, etc) on or off your ViewHub. Toggle this off to see areas of your screen share that may otherwise be hidden. Toggle the info back on when another user would like to connect.
9. Actions BarTailor your screen sharing bar to access the tools you use most in your meetings. This includes:
Switch Share
Take Snapshot (downloads a snapshot of your shared screen or window to your computer)
Focus Screen
End Screen Share